
📶 Signals Navigation
Signals combine your Spheres with Message Template Collections to create automated message sequences.
💡 You can use the provided Message Templates from the default "Keep In Touch" Signal or create custom templates to meet your needs.
🤝 "Keep In Touch" Signal & Message Template Collections
We've created the "Keep In Touch" Signal and Message Template Collections to help you succeed with your Blutext Dashboard.
Upload your Sphere
Attach it to the Signal
Activate ✅
⬇️ Click an option below to open your Blutext Dashboard and review the default Message Template Collections.
Includes 10 templates for personalized birthday greetings that trigger annually when a contact’s birthday is added.
Includes 20 templates of friendly check-in messages to re-engage contacts who haven’t been contacted recently.
Includes 10 templates celebrating a contact’s home purchase anniversary, triggered annually only if the buyer’s closing date is added.
Includes 10 re-engagement message templates referencing a contact’s current home value estimate, triggered only if the property address is included in the contact’s details.
Includes 12 message templates designed for initial outreach when first using Blutext for your Sphere of Influence.
Includes 10 message templates about recent property sales near a contact’s home, triggered only if the property address is included in the contact’s details.
📊 Signals at a Glance
Signals include sections for:
🏷️ Naming
📝 Describing
🤝 Sharing with other Blutext users
⏱️ Setting send frequency
📂 Attaching Contact Spheres
💬 Adding Template Collections for Greetings, Date-Specific, and Recurring messages
When you access the Signals section, you will see:
👥 The number of Contacts attached
📂 The number of Template Collections attached
⚡ The Signal’s status: Active, Paused, or Draft

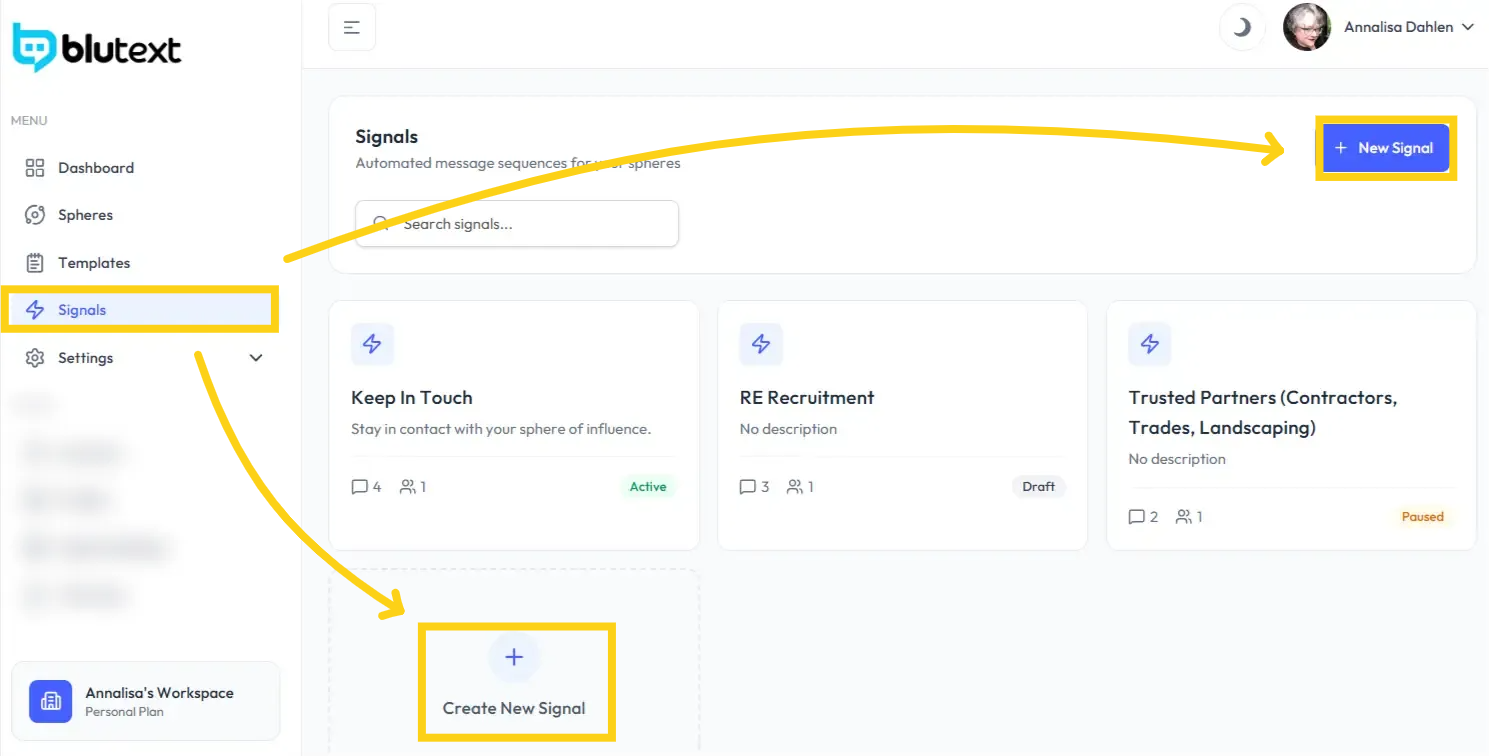
The Keep in Touch Signal has four Template Collections added, and is Active.
The RE Recruitment Signal has three Template Collections added, and is in Draft form.
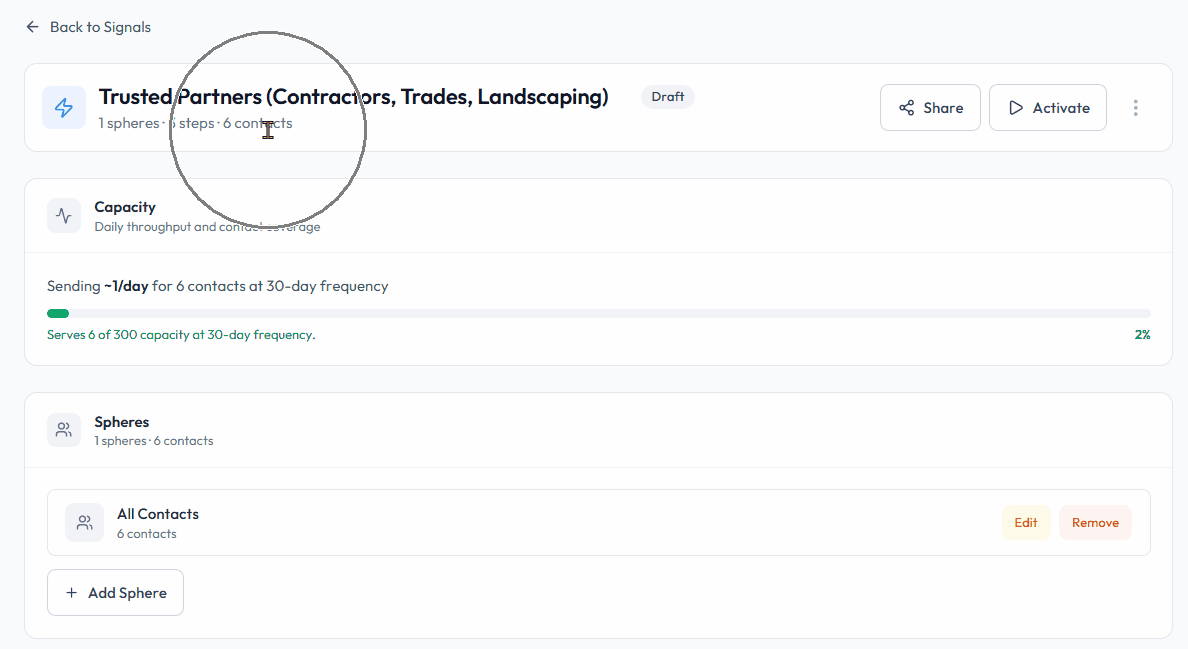
Trusted Partners signal has two Template Collections added, one Contact, and is Paused.
🛠️ How to Create a Signal
This section guides you in creating a Signal from scratch, including:
📂 Attaching a Sphere
💬 Adding the default "Keep in Touch" Signal or create custom Message Template collections.
Step 1 Create new Signal
Click "Signals" on the left-hand side of the Dashboard. Then click the 🔵 "+ New Signal" button at the top right or "+Create New Signal" on the page.
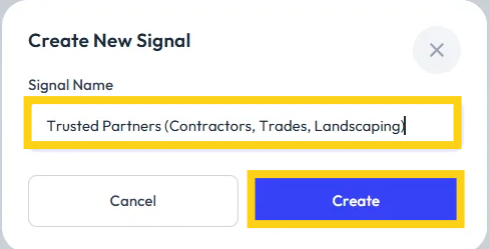
Step 2 Name the Signal
✏️ Add a "Signal Name" to the pop-up, then click the 🔵 "Create" button.
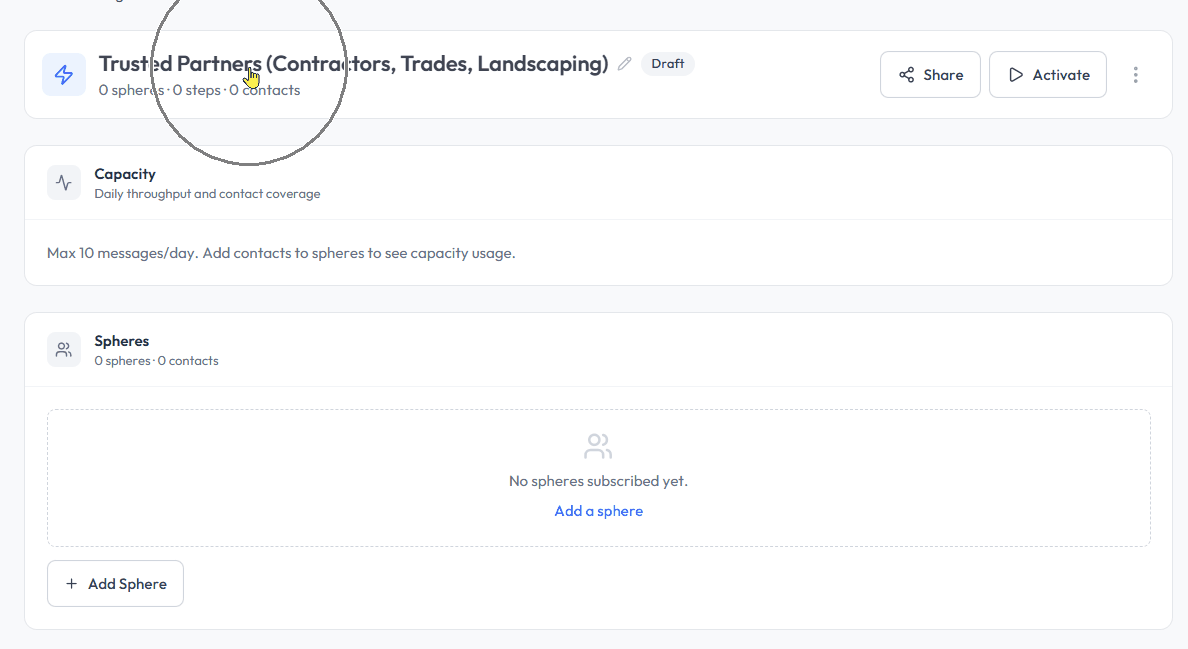
Step 3 Capacity
The Capacity section displays your daily throughput and contact coverage, which are calculated based on the size of the Sphere you connect in the next step.
⚠️ Note: This data will not display until the Sphere is attached to the Signal. Once added, you will see the daily throughput and contact coverage for the Signal.

Spheres
Spheres is where you connect the Contact Spheres you have imported into Blutext and assign them to a Signal.
Step 4 Add Spheres
Click "Spheres" on the left side of the Signal. Then, click the white "+Add Sphere" button at the top right or the 🔵 "+Add Sphere" prompt within the tile.
On the pop-up tile, select a Sphere by clicking the box ⬜ to the left of its name. Next, click the 🔵 "Add X Sphere" button to add the selected Sphere(s) to the Signal.
Edit a Sphere from Signals
Click "Spheres" on the left side of the Signal. Next, click "Edit" (🟧 highlighted in orange) to the right of the Sphere name.
You will be redirected to that specific Sphere, where you can add, edit, or remove Contacts from the Sphere.
To learn more about editing Spheres, click here.
⚠️ Note: This action will update the Contact added via Spheres on all Signals that have this Sphere assigned. Support cannot revert an edited Sphere.

Remove a Sphere
Click "Spheres" on the left side of the Signal, then "Remove" button on the far right of the Sphere name. Click the 🔴 "Remove" button to confirm.
⚠️ Note: This action is immediate and cannot be restored by Support. You will need to re-add the Sphere if necessary.

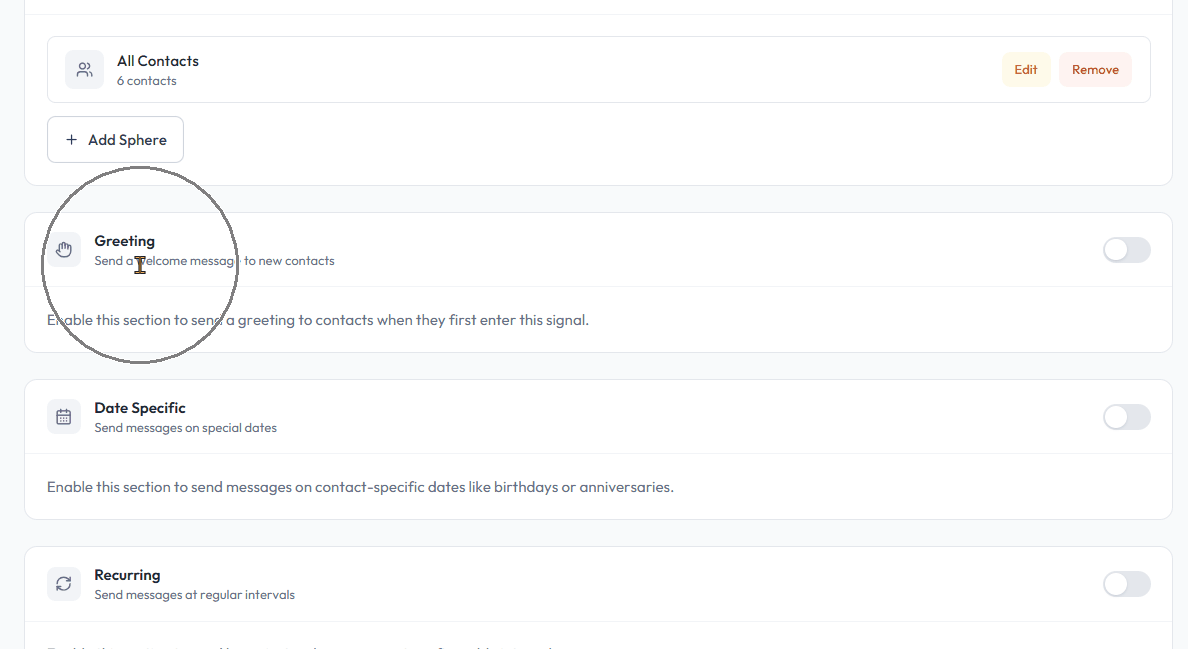
Template Collections
Assign a Template Collection to each message type you want to trigger. You can add Template Collections in three areas:
👋 Greeting – for initial contact
📅 Date Specific – birthdays, home anniversaries
🔄 Recurring – general re-engagement
💡 Use our default collections or create your own.
⚠️ Note: Each section is off by default, so click the toggle on the right 👉 to turn on the Templates for that section.

Step 5 Add Template Collections
There are three types of Templates you can add into a Signal:
👋 Greeting – for initial contact
📅 Date-Specific – birthdays, home anniversaries, or other important dates
🔄 Recurring – general re-engagement messages
📂 You will see examples of each section below.
Greeting
Toggle the Greeting on 👉. Click "Add Template" or "Link a Template Collection". Select the desired Greeting Template Collection.
You will return to the Template section with the collection added ✅.
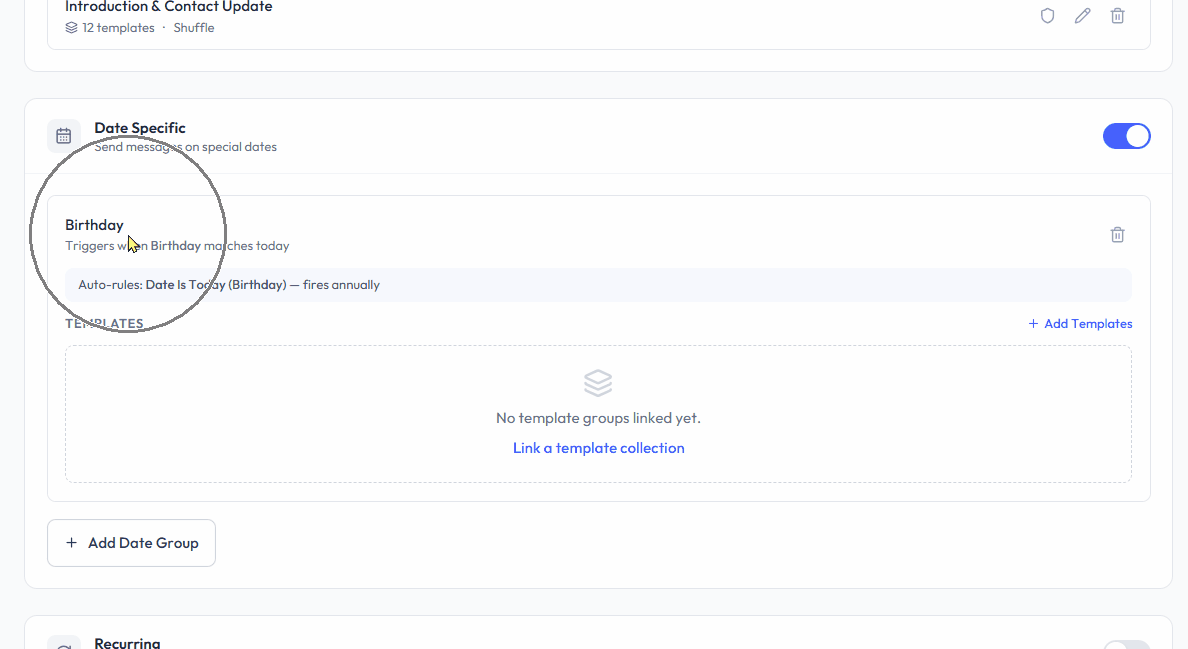
Date Specific
Toggle the Date-Specific section on 👉. Click the "Add Date Group" button at the bottom left. Select the date type to trigger – Birthday 🎂 or Closing Date 🏡. Click the 🔵 "Add Date Group" button.
⚠️ Note: The contact must have the birthday or closing date added to their record for these Date-Specific templates to trigger.

Click "Add Template" or "Link a Template Collection". Select the desired Date-Specific Template Collection.
The collection will be added to the Template section ✅.
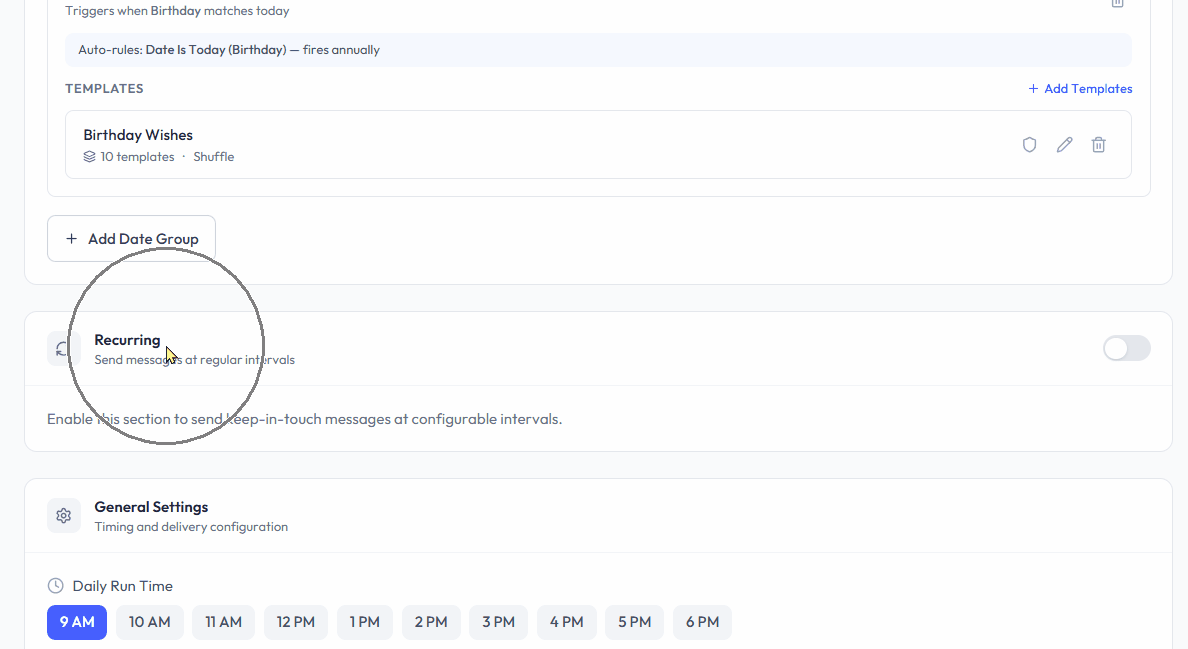
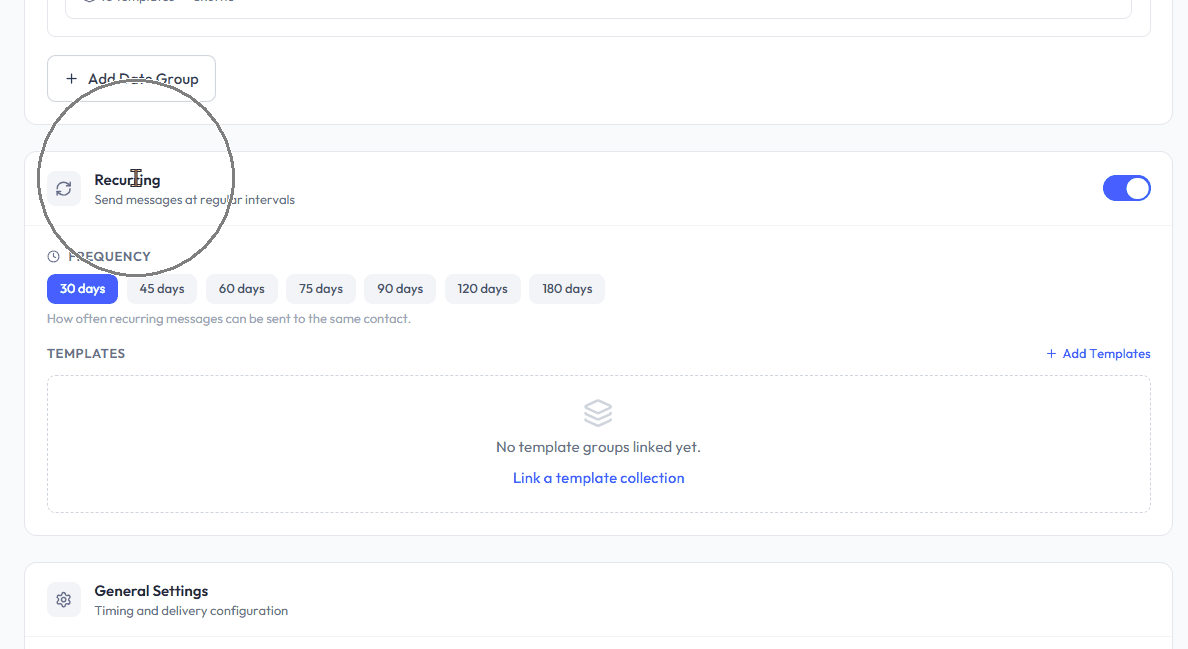
Recurring
Recurring is ideal for ongoing relationship growth, using the default General Re-engagement or any custom re-engagement Template Collection you create.
Toggle Recurring on 👉. Click "Add Template" or "Link a Template Collection". Select the desired Recurring Template Collection to add it to the Template section ✅. Go to the Frequency section ⏱️ and select how often you want the recurring texts to be sent.
Click "Add Template" or "Link a Template Collection". Select the desired Recurring Template Collection. The collection will be added to the Template section ✅.
Edit Templates
Click the pencil icon 🖉 to the right of the Template name to access editing.
You will be redirected to that specific Message Template Collection, where you can add, edit, or remove Message Templates from the collection.
To learn more about editing Message Templates, click here.
⚠️ Note: This action will update all Message Templates that have this Signal assigned to them.
Remove Template Groups
Click the trashcan icon 🗑️ to the right of the Template name. Click the 🔴 "Remove" button to confirm.
⚠️ Note: A removed Template Group cannot be restored by Support. You must add it back manually.
General Settings
Step 6 Select Daily Run Time
Click the time you want messages to start triggering from Blutext each day.
⚠️ Note: Signals are sent daily between 9 AM – 7 PM in the recipient’s time zone.

How to Activate, Pause or Delete a Signal
Activate a Signal
Click the white "Activate" button" with the play icon ▶️ at the far right of the Signal Name to turn it on.
Once activated:
The "Draft" label ⚪️ (gray highlight) updates to "Active" ✅ (green highlight)
The white button updates to "Pause" ⏸️ with a pause icon

Pause a Signal
Click the white "Pause" button" with the pause icon ⏸️ at the far right of the Signal Name to pause the Signal.
Once paused:
The "Active" label ✅ (green highlight) updates to "Paused" 🟧 (orange highlight)
The white button updates to "Activate" ▶️ with a play icon

Delete a Signal
Click the three dots "kebab" menu ⋮ at the far right of the Signal Name. Click "Delete", then click "Delete" again to confirm.
You will be redirected to the Signals page, where you can create a new Signal.
⚠️ Note: Deleting a Signal is permanent and cannot be recovered by Support.
Need help? Contact us at support@blutext.com or chat with us at the bottom right of our blutext.com website or knowledge base.