
🚀Spheres Navigation
🚀 Spheres Navigation is here to supercharge your dashboard! 🌟
📥 Import your contacts from Excel CSVs in a flash ⚡
💎 Organize and customize your Spheres of Influence like a pro 🤝✨
🎯 Turn your data into meaningful connections—and actually have FUN doing it! 🎉💥
*Note: ⚠️ Follow TCPA & state messaging rules! If you don’t want to message a contact, move them to the DNC List ✅ to stay compliant and avoid unwanted messages. 📋
How to Create a Sphere
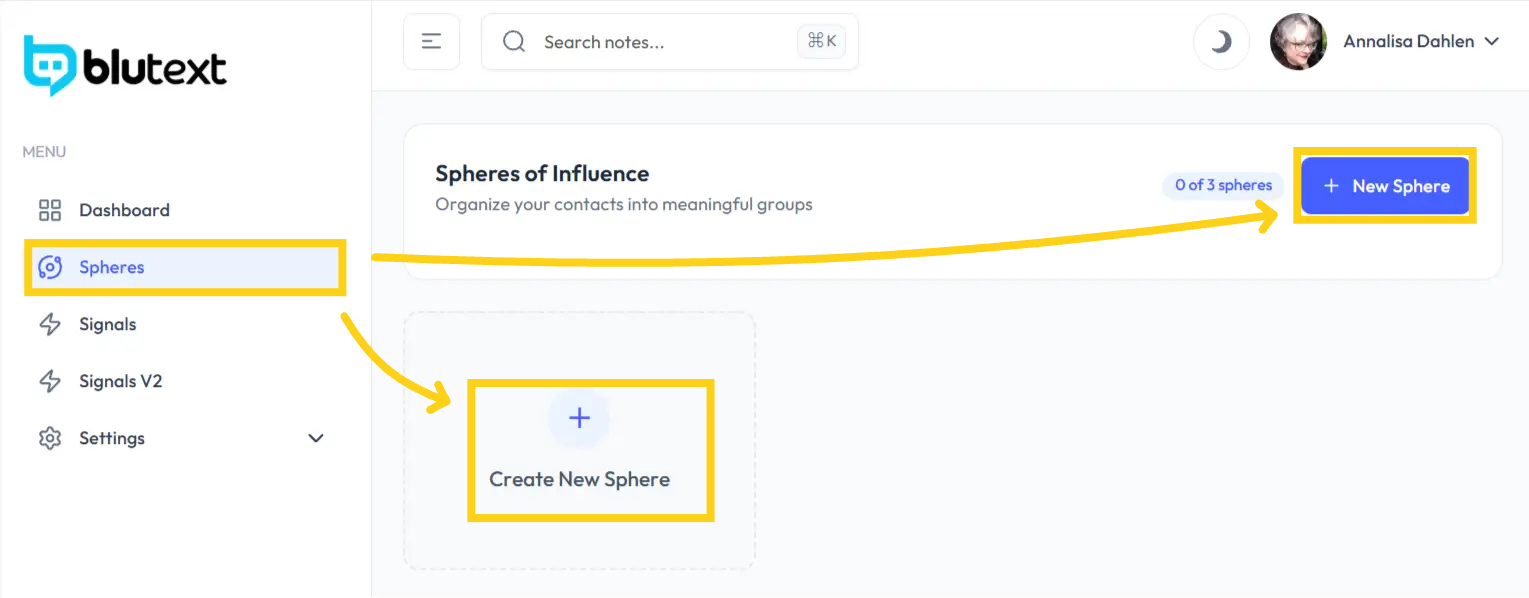
Step 1 Locate Sphere
Click "Sphere" in the left menu.
To create a new Sphere:
Click the "+Create New Sphere" tile
OR click the 🔵 "+New Sphere" button at the top right
To add contacts to an existing Sphere, select the Sphere from the list.
Step 2 Create a Sphere
Add a Sphere Name. Click the 🔵 "Create" button.
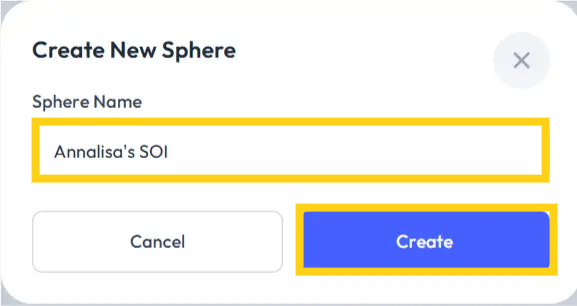
The Sphere page will refresh to display the newly created Sphere.
✏️ Correct the name
📝 Add a description
🎨 Select a color designation
Click "Settings" ⚙️ or the pencil icon 🖉 next to the name and description to make edits, then click the 🔵 "Save" button.
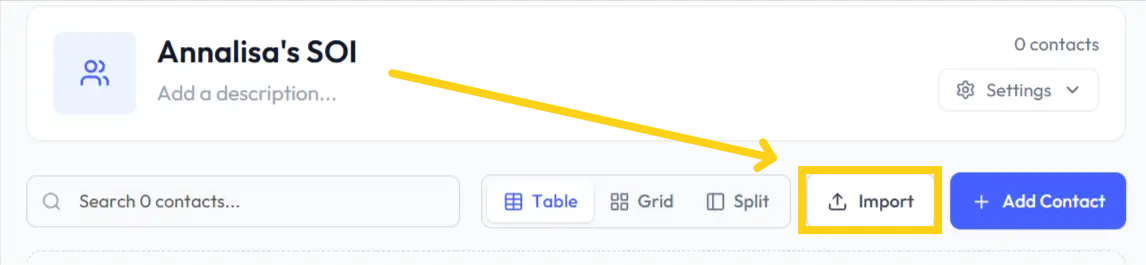
Step 4 Import
Click "Import" 📤 to the left of the blue "+Add Contact" button.
Step 5 Upload CSV File
The CSV File import process ensures that data is accurately represented and easily accessible within the dashboard.
You can import files into Spheres in a couple of ways:
1. Drag and Drop
Drag the CSV file from your desktop into the Blutext import field 📤.
Click to Import
Click the "Import" field 📤. Find the CSV file on your computer. Select the file and import it into Blutext ✅.
*Note: You can also manually add a Contact into Sphere one-by-one.
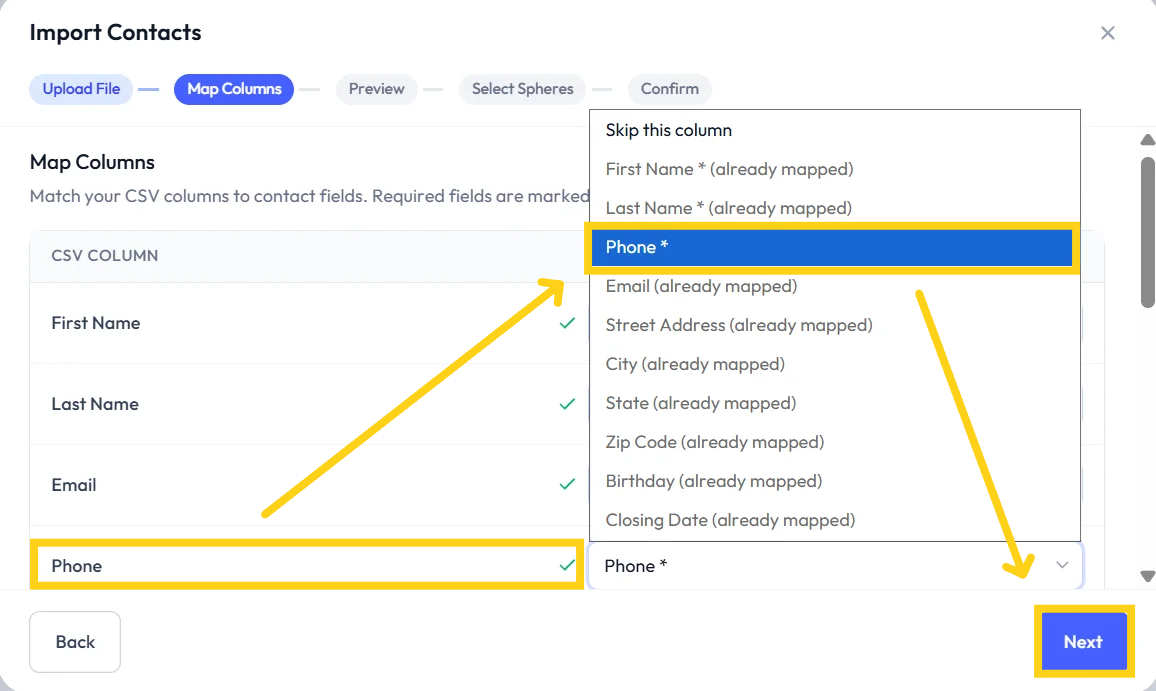
Step 6 Map Columns
🔗 Match CSV Columns to Contact Fields
Match your CSV columns to contact fields. Required fields are marked with an asterisk ✳️.
If the match is successful:
✅ You will see a green checkmark to the left of the Contact Field name
Click the 🔵 "Next" button at the bottom right of the screen
If there is a red check ❌:
Click the Contact Field dropdown and select the correct column name
Click the 🔵 "Next" button at the bottom right to proceed
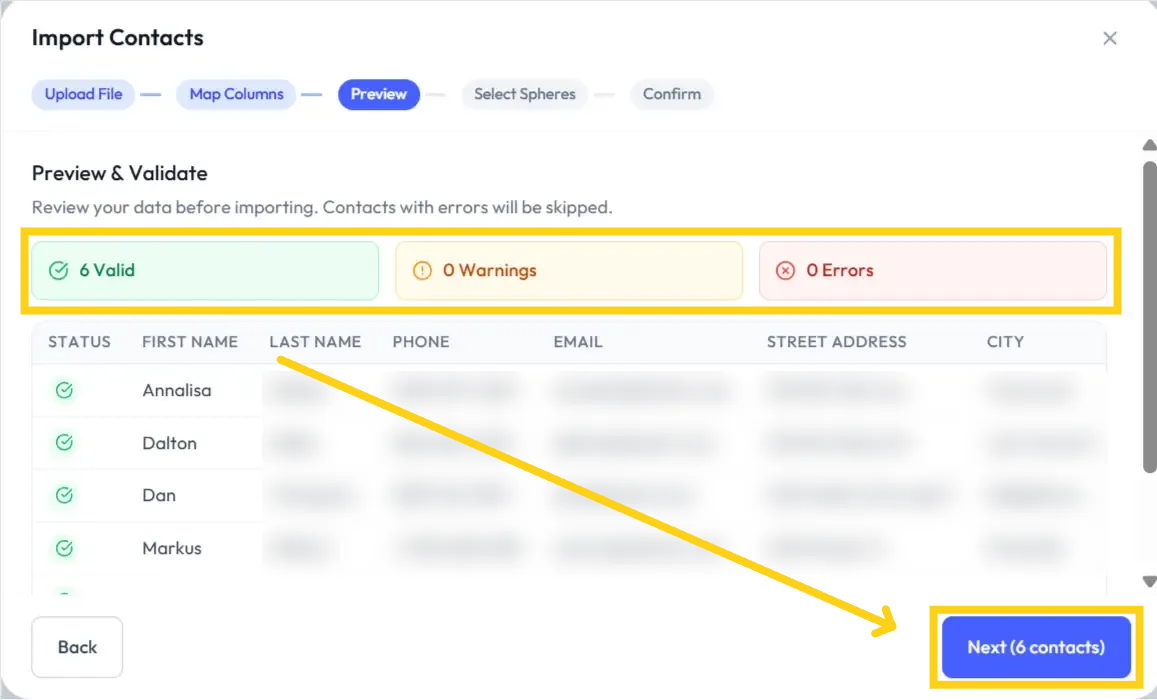
Step 7 Preview & Validate
Review your data before importing. Contacts with errors ⚠️ will be skipped. Make any corrections as needed. Click the 🔵 "Next" button at the bottom right of the screen ✅.
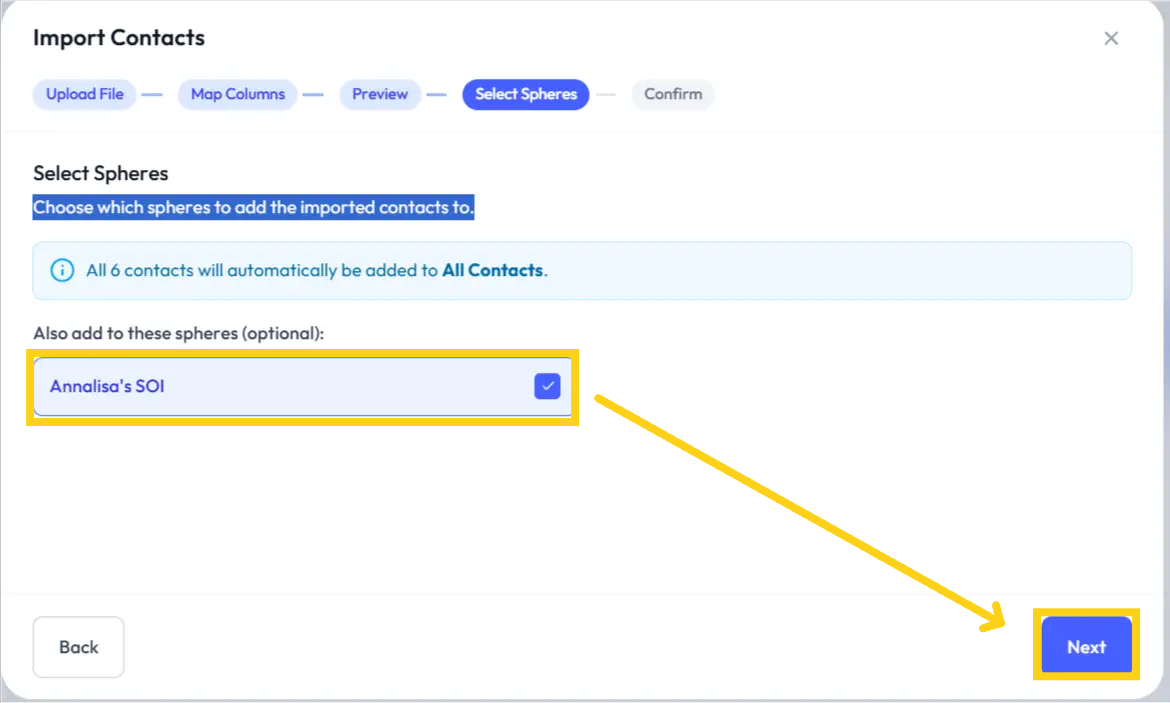
Step 8 Select Spheres
Select Sphere(s) for Imported Contacts
If you have more than one Sphere, click to choose which Sphere(s) to add the imported contacts to.
Click the 🔵 "Next" button at the bottom right of the screen ✅.
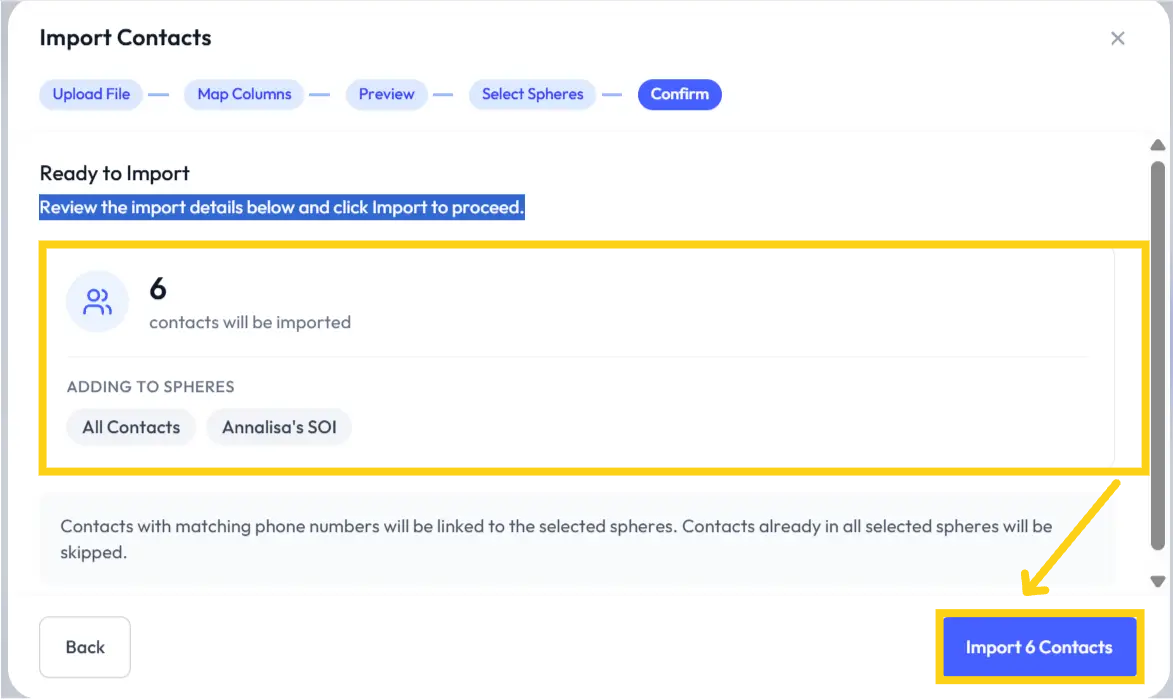
Step 9 Confirm Sphere
✅ Finalize Contact Import
Review the import details below.
Click the 🔵 "Import Contacts" button to proceed.
⚠️ Note:
Contacts with matching phone numbers will be linked to the selected Spheres.
Contacts already in all selected Spheres will be skipped.
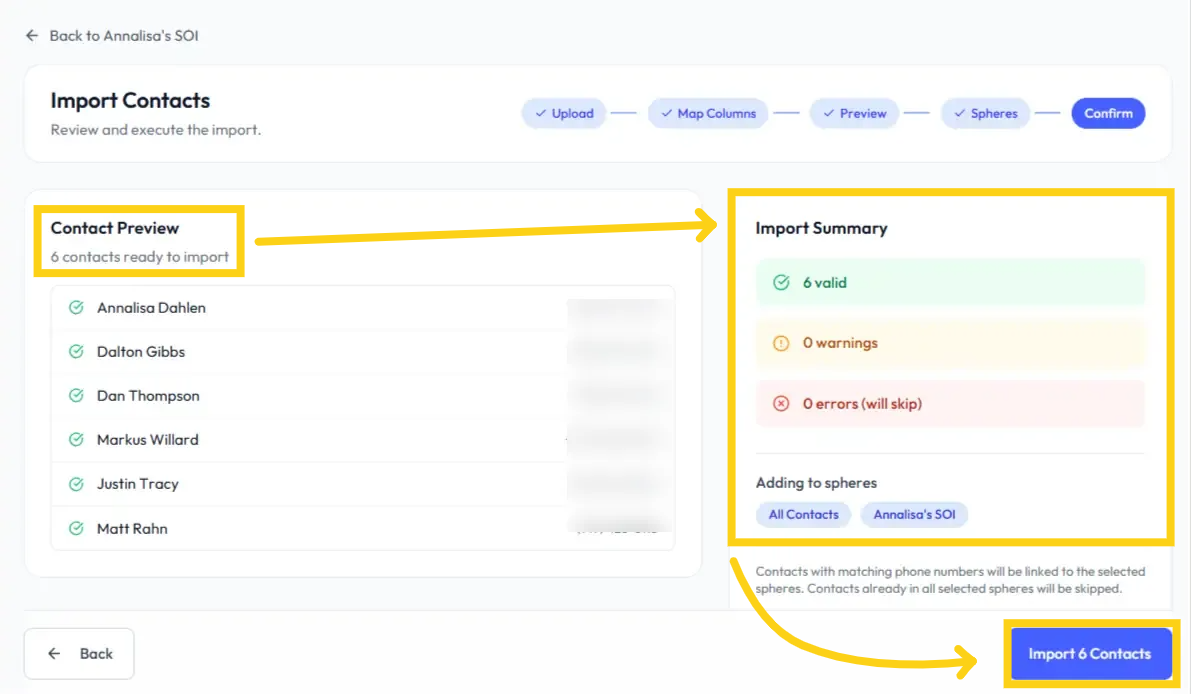
Step 10 Contact Preview & Import Summary
The page will display:
Contact Preview on the left
Import Summary on the right
Click the 🔵 "Import X Contacts" button at the bottom right to continue ✅.
Contacts with matching phone numbers 📞 will be linked to the selected Spheres.
Contacts already in all selected Spheres 📂 will be skipped.
Step 11 Import Complete
The page will update to show a recap of the completed import. Click the 🔵 "Done" button to proceed.
This will trigger the system to automatically run the built-in DNC Check ⚠️.
Step 12 Review Created Sphere
The page will display the Sphere you just created.
Click any contact row or the three-dot menu ⋮ to edit and review contacts.
⚠️ DNC Status Indicators:
"DNC Flagged" 🚫 – marked in red on the row, at the top of the record, and within the DNC Status tile.
"DNC Clear" ✅ – indicated on the row and at the top of the Contact Record.
⚠️ Note: You are responsible for following TCPA & all applicable state rules for messaging.
DNC Flagged Example
🚫 DNC Flag gives you the power to choose whether or not to message a contact! 💬
⚠️ Your responsibility: If you decide not to send messages to that contact, make sure to move their number to the DNC List ✅—that way, you stay compliant and avoid any unwanted messages. 📋
How to Add Contacts to a Sphere
Just open your "All Contacts" sphere 👥, then start checking the boxes on the left side of the contacts list ✔️
Once you’ve picked your people, hit the blue "Add to Sphere" button in the top right 🔵
Next, choose the sphere(s) you want to add them to 🌐 (yes, you can pick more than one 🙌), and then click the blue "Add to X Sphere" button—where X shows how many you selected 🎯
Boom 💥—your contacts are organized like a pro! 🚀
How to Remove Contacts from a Sphere
Need to remove contacts from a sphere? Easy peasy 😎🧹
Open the sphere you want to clean up 🌐, then check the boxes next to the contacts you want to remove ✔️
Once you’ve made your picks, click the orange "Remove" button at the top right 🟠
Finally, hit the orange "Remove X Contact" button (you’ll see the number of contacts you selected 👀)
And just like that—poof! ✨ They’re gone from the sphere 🚀
How to Navigate a Contact Record
Open the Sphere of which the Contact is assigned, then click any contact row or the three-dot menu then "View Details.
How to Manually Create a Contact Record
Adding a new contact is quick and smooth 😄📇
Click the blue "+Add" button at the top right 🔵➕
Fill in the required fields: First Name, Last Name, and Phone Number 📝📱
Want to add more details? You can also include email, birthday, closing date, and address 🎂📍✉️
Once everything looks good, click the blue "Add Contact" button ✅
Done! 🎉 Your new contact is ready to go 🚀
Editing a Contact Record
Click the "Edit" button in the slide-out panel. Make your updates. Click the 🔵 "Save" button ✅.
Deleting a Contact Record
Click the orange "Remove from Sphere" button 🟧.
Click the orange "Remove" button 🟧 to confirm.
⚠️ Note:
If you remove a Contact from a Sphere, you must manually re-add it later.
Deleting a Contact from the Dashboard is permanent and cannot be recovered by Support.
How to Delete a Sphere
Deleting a sphere is simple—just be sure you’re ready to say goodbye 😬🗑️
Open the sphere you want to delete 🌐
Click "Settings" at the top right ⚙️
Then hit the red trash can icon at the bottom left 🗑️🔴
Finally, click the red "Delete" button to confirm ❗
And just like that… it’s gone 👋💥

⚠️ Note: Deleting a Sphere 🗑️ is permanent, and Support cannot recover it. You will need to re-import and set up the Sphere manually.
Need help? Contact us at support@blutext.com or chat with us at the bottom right of our blutext.com website or knowledge base.